Installing casters seems simple until it begins to affect equipment uptime, load stability, and worker safety. A poorly chosen caster or an incorrect installation can create issues such as increased handling effort, floor damage, or early wheel failure. For procurement teams and operations leaders, these problems show up as slower throughput, higher repair costs and unnecessary maintenance hours.
That is why installing casters correctly is not just a maintenance task; it's a reliability decision. The global casters market is projected to reach USD 23.7 billion by 2035, growing at a CAGR of 9.1%, highlighting their increasing role in efficient operations.
A structured installation process helps prevent loose fittings, misaligned mounting plates, and load issues that affect throughput. With the right preparation, tools, and installation steps, you can improve equipment stability, extend caster life, and maintain consistent performance.
This guide breaks down how to install casters with steps that help reduce installation errors and deliver better long-term results.
At a Glance:
Proper caster selection and installation are critical for equipment stability, worker safety, and long-term performance.
Understanding caster types, materials, and floor compatibility ensures smooth movement and reduces wear on both equipment and flooring.
A structured installation process, including accurate measurements, pilot holes, and alignment checks, prevents common errors and operational issues.
Ongoing maintenance, such as cleaning, lubrication, and load monitoring, extends caster life and maintains consistent performance.
What Are Casters?
Casters are undriven wheels attached to the bottom of equipment, furniture, or industrial carts to enable movement. They are widely used in industrial, commercial, medical, and educational settings.
Here’s why they matter:
Mobility and Maneuverability: Casters allow heavy equipment to be moved easily, reducing manual effort and minimizing the risk of injuries or strain on staff.
Load Support and Safety: The right caster distributes weight effectively, preventing equipment tipping, floor damage, and premature wear.
Operational Efficiency: Proper caster selection and installation help maintain equipment uptime, reduce downtime, and improve workflow in industrial, commercial, and healthcare settings.
Longevity of Equipment: Well-chosen casters reduce stress on frames and machinery, lowering maintenance costs and extending the life of the equipment.
Environment-Specific Performance: Different floor types and operational conditions require specific caster materials and types to prevent issues like binding, noise, or excessive wear.
In the following section, let's explore the different types of casters available.
Types of Casters
Casters come in a variety of designs, each suited for specific loads, floor surfaces, and mobility requirements. Understanding the differences ensures you select the right caster for the job.
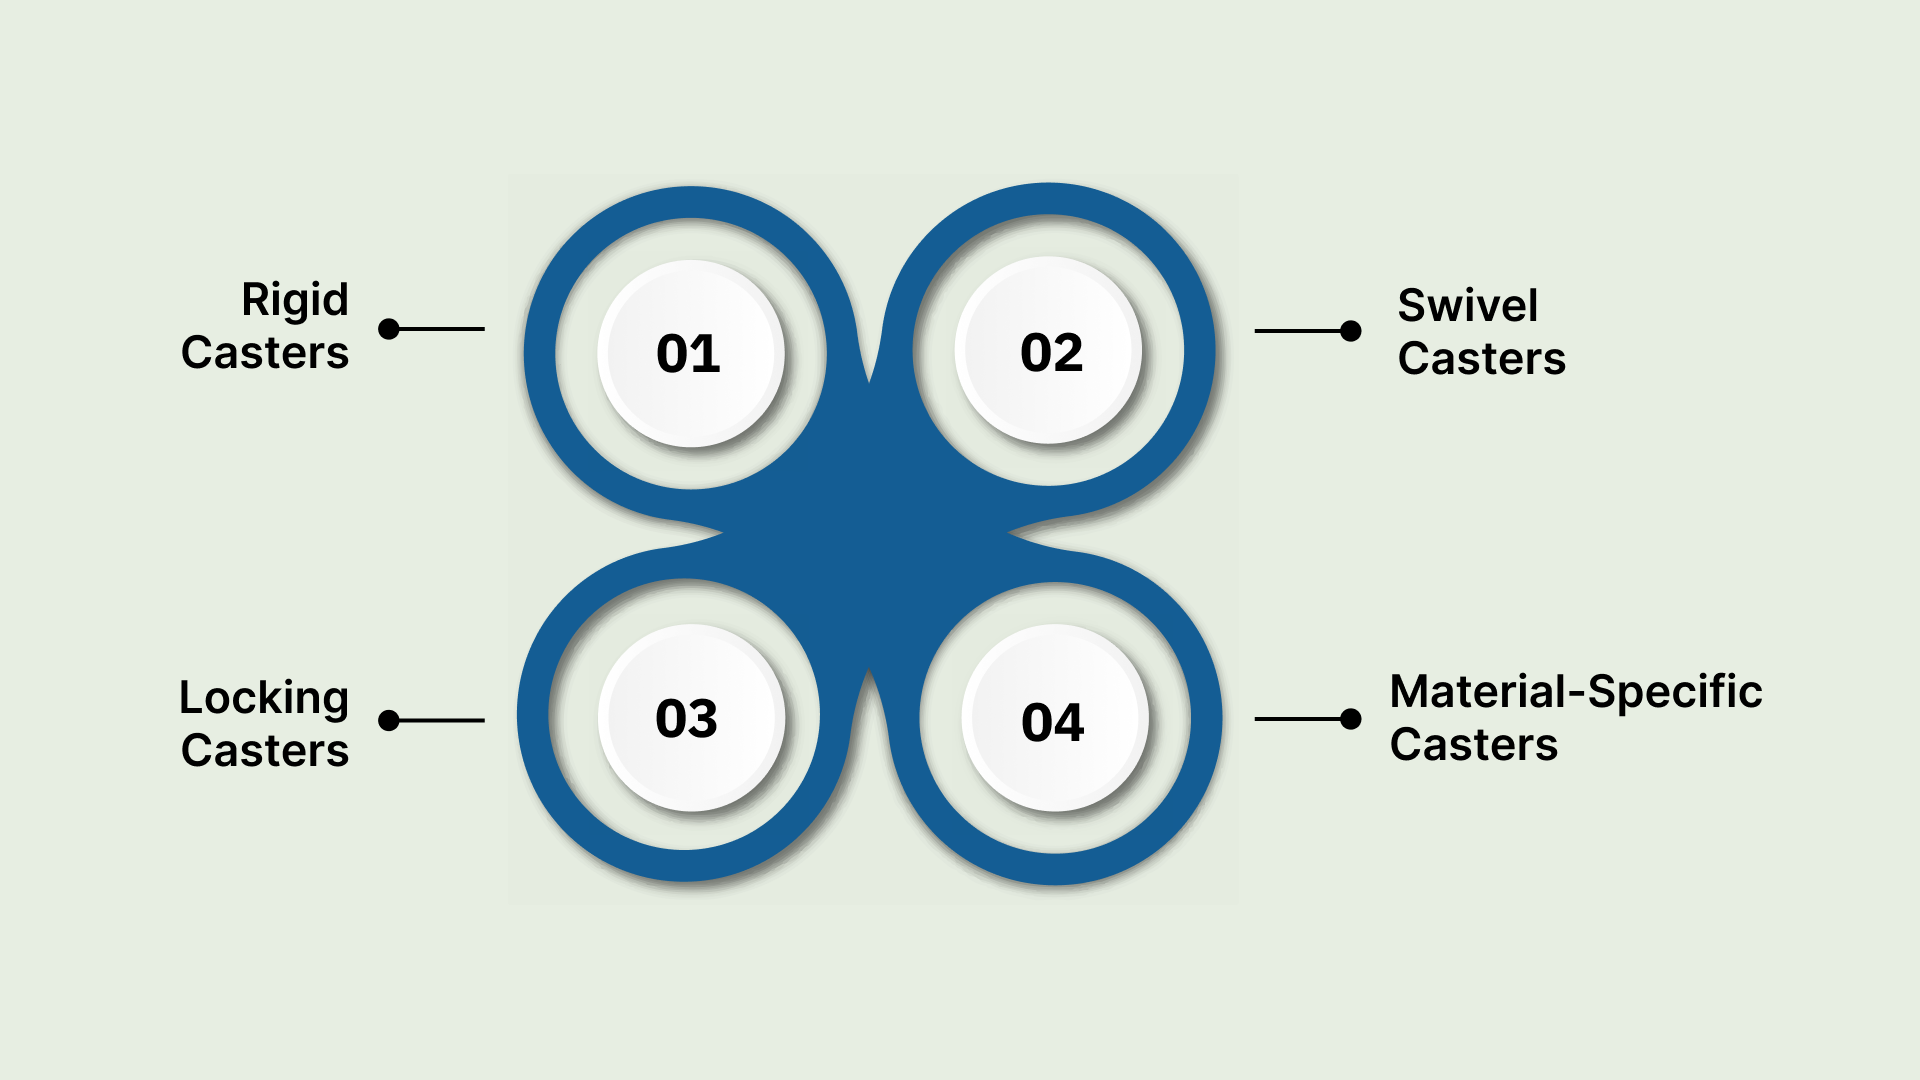
Rigid Casters
Rigid casters move only in a straight line. They provide strong directional control and are commonly used on heavy carts that follow fixed travel paths.
Ideal use-case: Best for equipment that moves long distances in straight corridors or along defined production lines.
Avoid when: The equipment must navigate tight spaces or change direction frequently.
Swivel Casters
Swivel casters rotate 360°, allowing the equipment to move easily in multiple directions. They improve mobility in tight spaces and support better handling.
Ideal use-case: Best for environments where workers need quick maneuverability, such as narrow aisles or workstations.
Avoid when: You need strict directional control or want to prevent side-to-side drift.
Locking Casters
Locking casters come with brakes that stop the wheel, the swivel motion, or both. They help maintain equipment stability during loading, unloading, or stationary operations.
Ideal use-case: Best for medical equipment, tool carts, and platforms that must stay securely in place during critical tasks.
Avoid when: The equipment is meant to stay mobile at all times, and constant locking/unlocking would slow workflows.
Material-Specific Casters (Rubber, Polyurethane, Steel, etc.)
These casters are designed for specific floor types and load conditions. The material affects noise levels, rolling resistance, and floor protection.
Ideal use-case: Best when floor type, noise limits, or surface protection is a priority, such as hospitals, cleanrooms, or epoxy-coated floors.
Avoid when: The wheel material is incompatible with the floor type (e.g., hard steel wheels on delicate flooring).
Selecting the right type is the first key to ensuring caster performance, load safety, and equipment longevity. In the next section, let's discuss the tools and materials that ensure smoother work and reduce avoidable delays.
Tools and Materials Needed for Installation
Proper installation starts with having the right tools and materials. A well-prepared workspace reduces errors and prevents delays during installation.
Wrenches and Socket Sets: Essential for securely fastening bolts and nuts, ensuring the caster remains stable under load. Proper torque prevents loosening during daily operations.
Screwdrivers: Required for mounting screws or adjusting hardware, depending on the caster type and mounting method. Choose appropriate sizes to avoid stripping screws.
Drill and Drill Bits: Needed to create precise pilot holes for bolts or screws. Correct hole sizing maintains equipment integrity and ensures proper caster alignment.
Mounting Plates or Bolts: Securely attach casters to equipment. Quality hardware ensures stability and reduces the need for frequent adjustments.
Washers and Nuts: Distribute load evenly and provide additional support for bolts, preventing loosening and maintaining alignment over time.
Measuring Tape or Ruler: For accurate placement of casters, maintaining balance and even weight distribution, which supports smooth movement.
Leveling Tool: Ensures casters are installed evenly, preventing uneven wear, operational inefficiencies, and potential safety hazards.
Having all tools and materials ready before installation minimizes interruptions and ensures consistent performance. Next, let's discuss the step-by-step process of caster installation.
Step-by-Step Caster Installation Process
Installing casters correctly requires careful attention to detail. Follow the steps below carefully to achieve optimal performance.
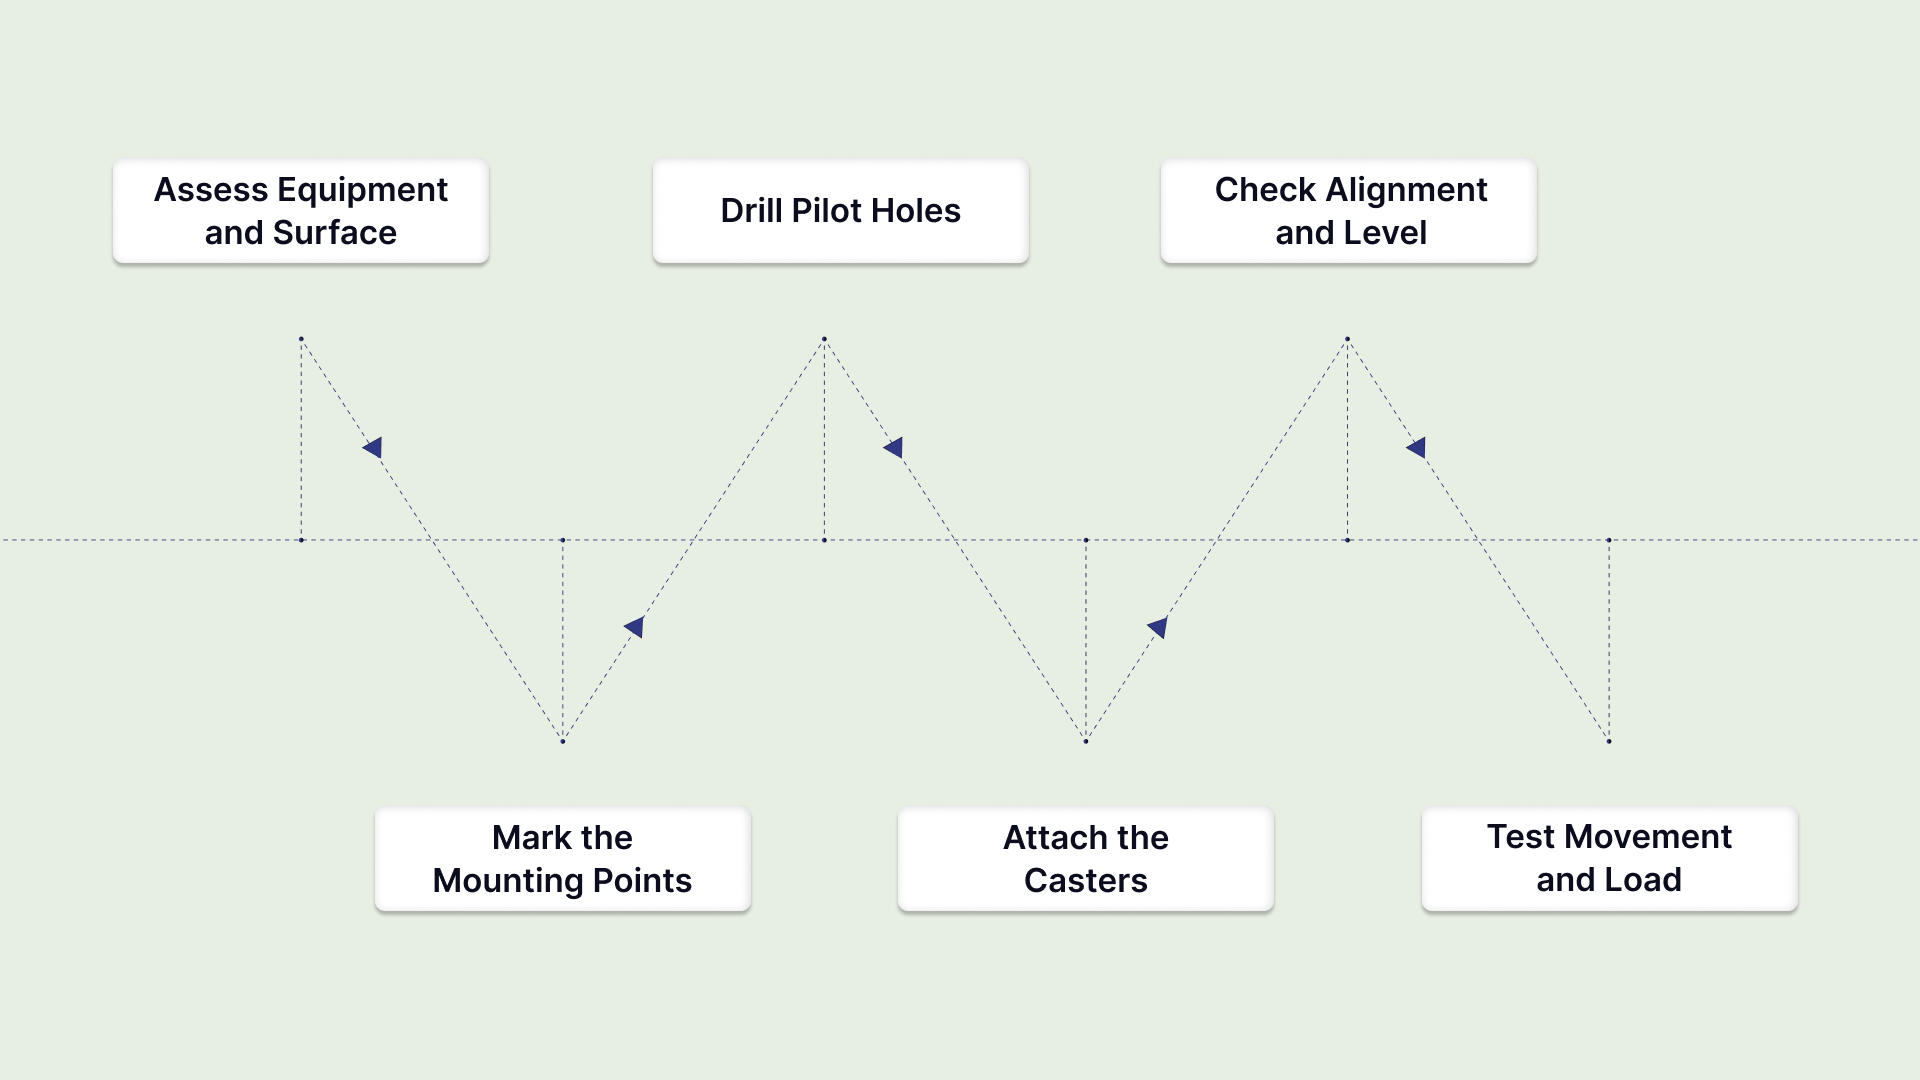
Step 1: Assess Equipment and Surface
Before installing casters, evaluate the equipment’s weight, base structure, and the type of flooring it will move across. This helps you choose casters that support daily loads and perform dependably in your workspace.
Check total load capacity: Review the equipment’s weight and add a buffer for tools or materials placed on it. This helps you avoid premature caster failure and unexpected downtime.
Inspect the base structure: Confirm that the mounting surface is strong and flat enough to support casters without bending or cracking under pressure.
Evaluate floor conditions: Consider whether the surface is smooth, uneven, or prone to debris. Choosing the right wheel material protects floors and keeps movement consistent.
A careful assessment gives you a solid foundation for choosing the right caster and supports smooth installation in the next steps.
Step 2: Mark the Mounting Points
Precise marking keeps casters evenly spaced, helps equipment stay stable under load, and prevents unnecessary stress on the frame. Clear markings make the next steps faster and more accurate.
Measure equal spacing: Use a measuring tape to mark consistent distances from the edges. Proper spacing supports balanced weight distribution.
Check corner squareness: Confirm all corners form right angles so casters sit correctly and equipment moves straight without dragging or drifting.
Use visible markers: Make clear, non-smudging marks to avoid confusion during drilling and fastening.
Accurate markings eliminate guesswork later in the process and help ensure smooth, predictable movement.
Step 3: Drill Pilot Holes
Pilot holes help protect the equipment base from cracking and allow bolts to fit securely. This step is important for ensuring a tight, long-lasting installation.
Match drill bit to fasteners: Select a bit that aligns with the caster’s mounting hardware to avoid loose fittings or overtightening.
Control drilling depth: Drill only as deep as needed to support secure fastening. This prevents unnecessary damage to the equipment frame.
Keep holes clean: Clear residue or shavings to allow bolts to sit flush and prevent future loosening due to trapped debris.
Creating precise pilot holes improves fastening strength and keeps the caster firmly attached during daily operations.
Step 4: Attach the Casters
This step involves securing the casters using the right hardware and ensuring they are mounted correctly. A strong attachment supports long-term performance and safe operation.
Align the mounting plate: Position the plate directly over the pilot holes to maintain alignment and prevent shifting during use.
Tighten hardware evenly: Fasten bolts in a cross pattern to distribute pressure and keep the caster base level.
Use washers and lock nuts: These components help maintain fastening tension, especially in environments with constant movement or vibration.
Proper attachment ensures the caster remains secure and stable through regular use and avoids unnecessary wear.
Step 5: Check Alignment and Level
Checking alignment makes sure each caster touches the ground evenly, preventing wobbling or uneven rolling. This step directly affects equipment stability and maneuverability.
Use a leveling tool: Place a level on the equipment base to confirm all sides sit evenly and no caster is raised or over-pressed.
Test swivel rotation: Ensure swivel casters rotate freely without rubbing or catching, which helps maintain smooth directional changes.
Inspect bolt tension: Recheck hardware tightness after adjusting alignment to avoid uneven strain during movement.
A quick alignment check prevents operational issues such as dragging, vibration, and unnecessary wheel wear.
Step 6: Test Movement and Load
A final test confirms that the casters handle the equipment’s weight and move smoothly in all directions. This step is essential before returning the equipment to regular use.
Push in multiple directions: Move the equipment forward, backward, and side-to-side to evaluate rolling ease and turning accuracy.
Check brake engagement: Make sure locking casters hold the equipment securely and release smoothly when needed.
Evaluate load behavior: Apply operational weight and observe how the casters respond to ensure they maintain stability under working conditions.
Testing the setup helps catch minor issues before they create delays or damage during everyday operations.
Following this process reduces the risk of equipment damage, prevents premature wear, and ensures safe, efficient movement. Next, let's understand the most common errors to give you a better chance of avoiding rework.
Common Installation Mistakes
Even small errors during caster installation can impact performance and increase maintenance costs. Awareness of common mistakes can save time and resources.
Here are some of the most common mistakes you should avoid:
Choosing the Wrong Caster: Using a caster that cannot handle the equipment’s weight or floor conditions often results in frequent replacements, increased downtime, and higher maintenance costs.
Improper Alignment: Misaligned casters create uneven load distribution, increase wear, and make maneuvering difficult, which reduces throughput and overall operational efficiency.
Loose or Insufficient Fastening: Failing to secure bolts, nuts, or mounting plates properly can cause equipment instability, safety hazards, and unexpected operational interruptions.
Ignoring Floor Compatibility: Selecting casters without considering floor type can damage surfaces, increase rolling resistance, and reduce mobility efficiency.
Skipping Maintenance Checks Post-Installation: Neglecting early inspections after installation may allow minor issues to escalate, directly affecting equipment uptime and long-term reliability.
Avoiding these mistakes ensures reliability, reduces scrap or damage, and supports consistent operational performance. In the next section, let's look at tips for ongoing maintenance of casters.
Tips for Maintaining and Optimizing Casters
Even well-installed casters require ongoing care to maintain performance and extend lifespan. Here are some tips you can follow:
Regular Cleaning: Remove dust, debris, and floor particles that can restrict rotation and increase rolling resistance. Clean wheels and swivels to maintain smooth movement and reduce strain on operators.
Scheduled Lubrication: Apply grease to bearings and swivel joints at consistent intervals. Proper lubrication reduces friction, extends caster life, and supports reliable performance under frequent use.
Fastener Tightening: Check and tighten bolts, nuts, and mounting plates during routine inspections. Secure hardware prevents wobbling, uneven rolling, and unnecessary stress on caster assemblies.
Wear Monitoring: Inspect wheels for cracks, flat spots, and uneven wear patterns. Early replacement prevents floor damage, improves mobility, and minimizes unexpected downtime.
Load Management: Ensure equipment stays within caster weight limits. Proper load distribution protects bearings, reduces failure risks, and helps maintain consistent throughput.
These practices improve equipment uptime, reduce scrap rates from damaged casters, and minimize operational delays.
How Humphries Casters and Supplies Can Simplify Your Installation?

A reliable supplier makes caster selection and installation easier, reduces risks, and supports long-term equipment performance. Humphries Casters and Supplies offers the experience, product range, and service depth needed by industrial and commercial operations.
Here’s how we can support you:
Wide Product Selection: Access a broad range of casters, wheels, and material handling equipment, sourced from over 400 global factories. This variety ensures you find the right product for your specific load, floor, and environment requirements.
Expert Guidance: With decades of experience serving leading manufacturers, hospitals, and care organizations, Humphries helps you choose casters that optimize uptime, load handling, and safety, minimizing trial-and-error.
Custom Solutions: If a standard caster doesn’t meet your needs, they can design and manufacture a tailored solution, ideal for unique equipment or specialized floor conditions.
Reliable Support: Their family-owned approach ensures responsive service, clear advice, and ongoing assistance, helping your team implement installations smoothly and maintain performance.
Proven Trust and Quality: Trusted by top companies and institutions for 27+ years, Humphries provides durable products and reliable service that keep your equipment moving safely and efficiently.
Partnering with a knowledgeable supplier like Humphries Casters and Supplies ensures you have the right products, expert guidance, and support to make installation and ongoing maintenance hassle-free.
Conclusion
Proper caster selection and installation are essential for safety, performance, and equipment longevity. Following the step-by-step guide ensures your equipment moves smoothly, reduces wear, and supports operational efficiency.
Maintaining casters through regular inspection and cleaning further enhances uptime and reduces replacement costs. By choosing quality supplies and leveraging expertise from trusted partners like Humphries Casters and Supplies, you can simplify installation, maintain reliable operations, and optimize overall mobility in your facility.
For expert guidance, sourcing, and support, contact us today and simplify your caster installation process.
FAQs
What is the difference between plate-mount and stem-mount casters?
Plate-mount casters attach with a flat metal plate secured by screws, offering stability for heavier loads. Stem-mount casters use a single post inserted into a socket, ideal for lighter furniture or limited space, but may handle less weight than plate-mounted options.
How do I measure for the correct caster size?
Measure the total height needed, including the caster wheel and mounting hardware, to ensure proper clearance. Consider wheel diameter, width, and load capacity based on your furniture or equipment, and factor in floor type to ensure smooth movement without obstruction.
Can casters be installed on any type of furniture or surface?
Most casters can be installed on wood, metal, or plastic furniture, provided the mounting surface is strong enough. Delicate materials may require reinforcement. For uneven or soft surfaces, choose wheels suited for stability and smooth mobility.
Can locking casters be added later to an existing setup?
Yes, many casters offer lockable versions that can replace standard wheels. Ensure the replacement casters match the original mounting type and size to maintain stability and support, and select locks compatible with your floor type and furniture weight.
How much weight can casters safely support?
Caster weight capacity varies by type, size, and construction. Check manufacturer specifications, accounting for total load and dynamic movement. Overloading can damage the caster and surface, so always select casters rated slightly above your furniture or equipment’s total weight.